


Cylinder Block Inspection and Repair
The cylinder block is the foundation of the Cummins ISM, ISMe, and QSM11 engines, supporting the crankshaft, pistons, and main bearings while housing the cooling and lubrication systems . Proper inspection, repair, and machining are crucial to ensure optimal performance, fuel efficiency, and engine longevity .
This guide provides step-by-step procedures for cylinder block inspection, measurement techniques, repair procedures, and best practices for servicing the main bearings and crankshaft .
For torque values, tolerances, and service specifications , refer to an OEM service manual or consult Diesel Pro Power for expert guidance.
Parts Catalog for ISM Cummins Marine and Industrial Engines
Parts Catalog for QSM11 Cummins Marine and Industrial Engines
Safety and Preparation Before Cylinder Block Service
Servicing a cylinder block requires attention to detail, precision measurements, and proper handling of heavy components .
Personal Protective Equipment (PPE)

✔
Safety glasses
– Protect against debris and metal shavings.
✔
Mechanic gloves
– Prevents cuts and chemical exposure.
✔
Steel-toe boots
– Protect against heavy falling parts.
✔
Hearing protection
– Recommended when using
power tools or grinders
.
Work Area and Tool Preparation
- Use a clean and well-lit workspace free from contaminants.
- Ensure all tools and measuring instruments are calibrated properly .
- Use an
engine stand or hoist
to support the
cylinder block
securely.
Essential Tools for Cylinder Block Inspection and Repair
✔
Dial bore gauge
– For measuring
cylinder bore wear
.
✔
Straightedge and feeler gauges
– For
deck flatness testing
.
✔
Micrometer set
– For
measuring journal and bearing clearances
.
✔
Cylinder honing tool
– For
reconditioning cylinder bores
.
✔
Torque wrench
– For
proper bolt tightening
.
Step-by-Step Cylinder Block Inspection and Repair Procedures
Step 1: Visual Inspection of the Cylinder Block
- Clean the Cylinder Block Thoroughly
- Use solvent and compressed air to remove oil, dirt, and debris .
- Inspect
all surfaces for cracks, corrosion, or warping
.
- Check for External Damage
- Look for cracks around main bearing webs and deck surfaces .
- Inspect
freeze plugs for corrosion or leakage
.
- Inspect the Cooling Passages
- Ensure coolant ports are free from blockages or scale buildup.
- Use a
borescope or flashlight
to check for
rust or internal erosion
.
Step 2: Measuring Cylinder Bore Wear
- Use a Dial Bore Gauge to Measure Bore Diameter
- Insert the dial bore gauge into each cylinder bore .
- Compare measurements to
OEM specifications
.
- Check for Out-of-Round and Taper Wear
- Rotate the gauge 90 degrees to check for bore distortion .
- If out of round
exceeds 0.002 inches (0.05mm), rebore the cylinder
.
- Inspect for Cylinder Liner Wear and Damage
- Look for scoring, pitting, or uneven wear inside the cylinders.
- If wear exceeds the
recommended limits
, the liners must be
replaced or honed
.
Step 3: Deck Surface Inspection and Flatness Check
- Place a Precision Straightedge Across the Deck
- Measure gaps with a feeler gauge .
- Maximum deck
warp should not exceed 0.003 inches (0.08mm)
.
- Inspect for Head Gasket Damage
- Look for
uneven wear, erosion, or combustion leaks
.
- Look for
uneven wear, erosion, or combustion leaks
.
- Machine the Deck Surface if Necessary
- If the surface is warped beyond specification , resurface the block.
- Maintain proper
deck height
to prevent compression ratio issues.
Step 4: Cylinder Honing and Liner Replacement
- Hone the Cylinders if Bore Wear is Within Tolerance
- Use a honing tool with medium-grit stones .
- Apply
light machine oil
to assist with honing.
- Replace Cylinder Liners if Needed
- Remove worn or damaged liners using a liner puller .
- Install
new liners and verify correct protrusion height
.
Main Bearing and Crankshaft Service
The main bearings and crankshaft are critical components that support engine rotation and power transfer . Proper servicing ensures optimal oil clearance, reduced friction, and longer engine life .
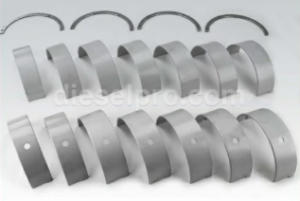
Step 1: Inspecting the Main Bearings
- Remove the Main Bearing Caps Carefully
- Loosen bolts in sequence to prevent block stress .
- Remove
bearing caps and keep them in order
.
- Inspect the Bearings for Wear and Damage
- Look for scoring, pitting, or metal transfer .
- If bearings show
copper exposure
, replace them.
- Measure Bearing Clearance with Plastigage™
- Place a strip of Plastigage™ on the crankshaft journal .
- Torque the main cap bolts to spec and measure squash width .
- Compare results with
OEM bearing clearance specifications
.
Step 2: Crankshaft Removal and Inspection
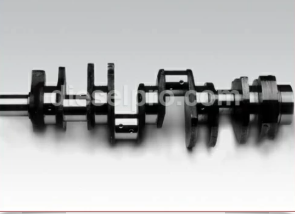
- Carefully Lift the Crankshaft Using a Hoist
- Secure the crankshaft with straps to prevent damage.
- Remove and
label bearing shells for reference
.
- Inspect the Crankshaft Journals for Wear
- Check for scoring, grooves, or heat discoloration .
- If wear exceeds
0.0015 inches (0.038mm)
, the crankshaft must be
reground or replaced
.
- Check Crankshaft Runout with a Dial Indicator
- Mount the crankshaft on V-blocks and measure runout .
- If runout exceeds
OEM limits, replace the crankshaft
.
Step 3: Installing New Main Bearings and Reassembling the Crankshaft
- Install New Bearings and Apply Lubrication
- Clean and lubricate bearing surfaces with assembly oil .
- Install
main bearing shells into the block and caps
.
- Lower the Crankshaft into Position
- Align the crankshaft with the main bearing saddles .
- Ensure
proper fitment without forcing it into place
.
- Torque Main Bearing Bolts in Stages
- Tighten bolts gradually in a cross-pattern .
- Use a
torque wrench to apply final torque values
per
OEM specs
.
- Check Crankshaft Rotation
- Rotate the crankshaft by hand to verify free movement .
- If resistance is felt, check for
misalignment or incorrect bearing fitment
.
Final Checks and Reassembly
Before reassembling the engine, ensure:
✔
All oil passages are clean and free of debris
.
✔
Crankshaft end play is within specification
.
✔
Main bearing caps are properly torqued and secured
.
✔
New seals and gaskets are installed before assembly
.
Final Notes on Cylinder Block and Crankshaft Service
✔
Always use precision measuring tools
to verify wear and clearances.
✔
Follow proper torque values and sequences
for main bearings.
✔
Maintain cleanliness to prevent contamination in oil and coolant passages
.
✔
Consult an OEM service manual or Diesel Pro Power for torque specs and tolerances
.
By following these best practices for cylinder block service and crankshaft maintenance , you ensure a strong, reliable foundation for the Cummins ISM, ISMe, and QSM11 engines.
Parts Catalog for ISM Cummins Marine and Industrial Engines
Parts Catalog for QSM11 Cummins Marine and Industrial Engines
