


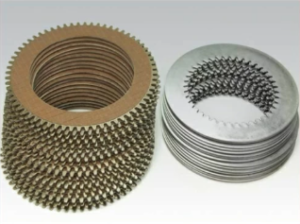
Parts Catalog for Twin Disc MG5075A Marine Transmissions
Plate Kit For Twin Disc MG5075A Marine Transmission
Gasket Kits For Twin Disc MG5075A Marine Transmission
Introduction to Reassembly and Testing of the Twin Disc MG5075A Transmission
Reassembling the Twin Disc MG5075A transmission after disassembly and repair is a critical process that requires precision, attention to detail, and adherence to proper torque specifications and alignment procedures . A thorough and systematic approach to reassembly ensures the transmission operates smoothly, efficiently, and reliably.
This section covers the proper alignment and torque specifications , reinstalling hydraulic components , fluid refilling and priming procedures , bench testing and operational verification , and final installation and system integration . Following these detailed guidelines will prevent common issues such as leaks, misalignment, and shifting failures , ensuring the transmission functions optimally once reinstalled in the vessel.
1. Proper Alignment and Torque Specifications
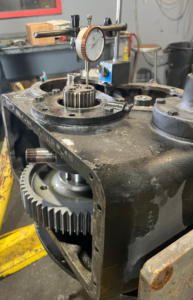
Before starting the reassembly process , it is essential to follow manufacturer-specified alignment tolerances and torque values to prevent premature wear and mechanical failures.
A. Ensuring Proper Shaft Alignment
✔
Input and output shafts must be perfectly aligned
to avoid vibration and wear.
✔ Use a
dial indicator
to check the alignment of the
output shaft to the propeller shaft
.
✔ Alignment should be within
0.002 to 0.005 inches
to ensure smooth power transfer.
Alignment Procedure:
- Position the transmission on a stable workbench or mounting fixture .
- Check for any shaft misalignment using precision measurement tools.
- Adjust the mounting position if necessary to
achieve the correct tolerances
.
B. Proper Torque Specifications
Using a calibrated torque wrench is crucial to ensure that bolts and fasteners are tightened correctly.
Component |
Torque Specification (ft-lbs) |
|---|---|
| Transmission mounting bolts | 75 – 90 |
| Input shaft bolts | 60 – 75 |
| Clutch pack fasteners | 40 – 55 |
| Output shaft coupling bolts | 80 – 100 |
| Hydraulic line fittings | 25 – 35 |
✔
Tighten bolts in a crisscross pattern
to distribute pressure evenly.
✔ Always refer to the
Twin Disc service manual
for exact specifications.
✔
Over-tightening can cause stress fractures
, while
under-tightening may lead to leaks and component shifting
.
2. Reinstalling Hydraulic Components
The Twin Disc MG5075A transmission uses a hydraulically actuated clutch system , requiring proper installation of hydraulic components to ensure smooth gear engagement and shifting.
A. Installing the Hydraulic Pump
✔ Align the
hydraulic pump mounting holes
with the transmission housing.
✔ Apply
a thin coat of transmission fluid
to the pump seals.
✔ Secure the pump using
properly torqued mounting bolts
.
✔ Rotate the
pump manually to ensure free movement
.
B. Reconnecting Hydraulic Hoses and Valves
✔ Ensure all
hydraulic hoses are free of cracks or damage
.
✔ Use
new O-rings and gaskets
on fittings to prevent leaks.
✔ Hand-tighten fittings first, then torque to
manufacturer specifications
.
✔
Bleed air from the hydraulic system
to prevent pressure loss.
C. Reinstalling the Clutch Pack
✔ Align the
clutch plates and pressure plates correctly
.
✔ Apply a
thin film of transmission fluid
to clutch discs before installation.
✔ Secure the clutch assembly using the
correct torque values
.
✔
Manually engage and disengage
the clutch to check for proper movement.
3. Fluid Refilling and Priming Procedures

Once the transmission is fully reassembled, it must be properly filled with fresh transmission fluid and primed to ensure smooth operation.
A. Selecting the Correct Transmission Fluid
✔ Use
Twin Disc-approved hydraulic transmission fluid
.
✔ Ensure the fluid has
anti-wear, anti-foam, and high thermal stability properties
.
✔ Check the
recommended viscosity
for the operating environment.
B. Refilling the Transmission with Fluid
- Remove the filler cap and insert a clean funnel.
- Slowly pour the recommended amount of fresh fluid into the reservoir.
- Check the fluid level using the dipstick to ensure the correct fill.
- Allow the fluid to
settle and circulate before final level check
.
C. Priming the Hydraulic System
✔ Manually
pump hydraulic fluid through the system
to remove air pockets.
✔ Start the engine at
low idle speed
and shift through
forward and reverse gears
.
✔ Check the
hydraulic pressure readings
and ensure they meet
OEM specifications
.
✔ Inspect for
fluid leaks at hose connections and fittings
.
4. Bench Testing and Operational Verification
Before reinstalling the Twin Disc MG5075A transmission , a bench test must be performed to ensure all components function correctly.
A. Setting Up the Bench Test
✔ Secure the transmission to a
test stand or workbench
.
✔ Connect
hydraulic lines to a controlled fluid supply
.
✔ Use a
dummy driveshaft or alignment fixture
to simulate output conditions.
B. Conducting the Transmission Bench Test
✔
Start the transmission in neutral
and observe for
abnormal noises or vibrations
.
✔ Shift into
forward and reverse gears
, ensuring
smooth engagement
.
✔ Monitor
hydraulic pressure and fluid flow
to verify proper operation.
✔ Observe for
leaks or overheating
during extended testing.
C. Inspecting for Final Adjustments
✔ If the transmission shifts
too harshly or slowly
,
adjust hydraulic pressure settings
.
✔ Ensure clutch engagement occurs
without excessive delay or slippage
.
✔ Check the
cooling system flow
to ensure adequate heat dissipation.
Performing bench tests before final installation allows technicians to identify and resolve potential issues before vessel operation .
5. Final Installation and System Integration
Once the MG5075A transmission has passed bench testing , it is ready for final installation and integration with the vessel’s propulsion system .
A. Mounting the Transmission to the Engine
✔
Align the transmission mounting holes
with the engine flywheel housing.
✔ Insert and
torque the mounting bolts
in a
crisscross pattern
.
✔ Ensure the
input shaft is properly seated
in the engine flywheel.
B. Connecting the Propeller Shaft
✔ Align the
output shaft to the propeller shaft
within
0.002-inch tolerance
.
✔ Secure the
coupling bolts
using
proper torque values
.
✔ Rotate the propeller shaft manually to
check for free movement
.
C. Final Hydraulic and Electrical Connections
✔ Connect all
hydraulic hoses and check for leaks
.
✔ Reinstall the
transmission control cables
, ensuring proper tension.
✔ Test the
electrical connections for the shift solenoids and sensors
.
D. Final System Check Before Operation
✔
Check transmission fluid levels
and
top off if needed
.
✔ Start the engine and
monitor transmission temperature and pressure
.
✔ Shift through
gears while observing engagement performance
.
✔ Conduct a
sea trial under load
to verify real-world performance.
Conclusion
Proper reassembly and testing of the Twin Disc MG5075A transmission ensures efficient and reliable operation in demanding marine conditions.
Key Takeaways:
✔
Align all shafts and torque bolts correctly
to prevent failures.
✔
Reinstall hydraulic components carefully
to ensure smooth operation.
✔
Refill and prime hydraulic fluids properly
to prevent shifting issues.
✔
Perform a thorough bench test
before final installation.
✔
Verify all system integrations
and conduct final operational checks.
By following these detailed procedures , marine operators and technicians can ensure their Twin Disc MG5075A transmission operates smoothly, efficiently, and reliably for extended service life.
Plate Kit For Twin Disc MG5075A Marine Transmission
Gasket Kits For Twin Disc MG5075A Marine
Transmission
Videos About Twin Disc Transmissions
6 Reasons Your Twin Disc Transmission Has Low Oil Pressure
7 Reasons Your Twin Disc Transmission Is Overheating
3 Reasons Your Clutch Plates in Your Twin Disc Transmission Are Making Excessive Noise
Bull Gear On A Twin Disc Transmission
Rebuilt Twin Disc Transmissions