


Parts Catalog for Twin Disc MG5075A Marine Transmissions
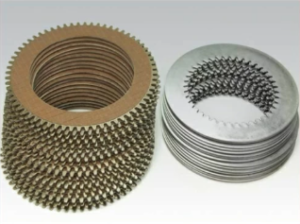
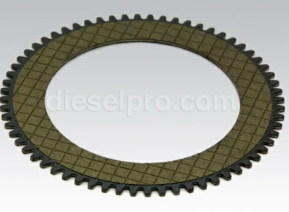
Plate Kit For Twin Disc MG5075A Marine Transmission
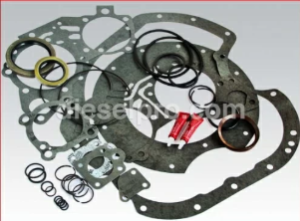
Gasket Kits For Twin Disc MG5075A Marine Transmission
Introduction to Disassembly and Repair of the Twin Disc MG5075A Transmission
The Twin Disc MG5075A transmission is a high-performance marine transmission system that requires periodic maintenance and repairs to ensure its longevity and efficiency . Over time, components such as clutch plates, bearings, and seals may wear out and require replacement or refurbishment .
A structured disassembly and repair approach is critical to prevent damage to internal components and ensure proper reassembly . This guide provides detailed step-by-step instructions on the disassembly, inspection, repair, and reassembly of the Twin Disc MG5075A transmission to help technicians and vessel operators maintain optimal performance .
1. Required Tools and Workspace Setup

Before beginning the disassembly of the Twin Disc MG5075A , it is important to have the right tools and a well-prepared workspace . Using the correct equipment ensures safe handling, efficient work, and prevents damage to transmission components .
A. Essential Tools for Transmission Disassembly
✔
Socket and Wrench Set
– For removing mounting bolts, covers, and fasteners.
✔
Torque Wrench
– To ensure proper torque application during reassembly.
✔
Pry Bars and Pullers
– For safely removing stubborn gears and bearings.
✔
Oil Drain Pan
– To collect drained fluids and prevent spills.
✔
Seal and Bearing Pullers
– For removing press-fit components without damage.
✔
Rubber Mallet
– To assist in loosening stuck components without causing damage.
✔
Dial Indicator and Feeler Gauges
– For measuring gear backlash and shaft alignment.
✔
Bearing Press and Hydraulic Press
– For reinstalling bearings and seals.
✔
Clean Rags and Degreaser
– For cleaning internal components before reassembly.
✔
Safety Glasses and Gloves
– For personal protection.
B. Preparing the Workspace
✔
Ensure the area is clean and free of debris
to prevent contamination.
✔
Set up a sturdy workbench
with proper lighting.
✔
Keep all necessary tools within reach
to streamline the process.
✔
Lay out a parts tray or table
to organize disassembled components.
✔
Have a service manual or reference guide available
for specifications and torque values.
Proper workspace organization and tool readiness help technicians work efficiently and prevent damage to transmission components.
2. Draining Fluids and Preparing for Disassembly
Before disassembling the MG5075A transmission , all fluids must be properly drained to prevent spills and contamination.
A. Draining Transmission Fluid
✔
Warm up the engine
to slightly increase oil fluidity.
✔
Turn off the engine
and let the transmission cool for safety.
✔ Place an
oil drain pan
beneath the transmission drain plug.
✔
Remove the drain plug
and allow all fluid to drain completely.
✔ Inspect the
drained oil for metal shavings or contaminants
.
✔
Replace the drain plug
and clean any excess oil from the transmission housing.
B. Disconnecting Hydraulic and Cooling Lines
✔
Use wrenches to disconnect hydraulic hoses
leading to the transmission.
✔
Cap off open hydraulic fittings
to prevent dirt or moisture intrusion.
✔ Disconnect
cooling system hoses
from the external oil cooler.
✔ Use
compressed air
to remove residual fluid from hydraulic and cooling lines.
C. Removing the Transmission from the Engine
✔
Support the transmission using a hoist or jack stand
to prevent damage.
✔
Loosen and remove all mounting bolts
connecting the transmission to the engine.
✔ Carefully
separate the transmission from the flywheel housing
.
✔ Lower the transmission onto a
stable work surface
for further disassembly.
Properly draining fluids and disconnecting external components ensures a clean and safe work environment for disassembly.
3. Step-by-Step Teardown Process
The teardown of the Twin Disc MG5075A transmission must be done in a systematic order to prevent damage and ensure correct reassembly .
A. Removing the Transmission Cover
✔ Identify and
remove all cover bolts
with a socket wrench.
✔ Use a
rubber mallet to tap the housing lightly
, breaking the gasket seal.
✔ Carefully
lift the cover off
, ensuring not to damage the gasket.
B. Extracting the Input Shaft and Clutch Assembly
✔ Use a
puller tool to remove the input shaft
.
✔ Inspect
shaft splines for wear
and clean thoroughly.
✔ Remove
clutch packs carefully
, keeping components in order for reassembly.
✔ Inspect
clutch discs and friction plates
for scoring or warping.
C. Removing the Gears and Bearings
✔
Label and remove gear assemblies
to maintain proper order.
✔ Use a
bearing puller to extract bearings without damage
.
✔ Inspect
gear teeth for pitting, cracks, or excessive wear
.
✔ If needed, replace
worn or damaged gears and bearings
.
D. Separating the Output Shaft and Final Drive Components
✔ Use a
hydraulic press if necessary
to remove tightly fitted components.
✔ Mark components to
ensure correct orientation during reassembly
.
✔ Inspect the
output shaft for signs of wear or misalignment
.
Proper documentation of component placement ensures a smooth and accurate reassembly process .
4. Inspecting Internal Components for Wear
After teardown, each component must be thoroughly inspected for signs of wear, damage, or contamination .
A. Clutch Pack Inspection
✔ Look for
signs of glazing, warping, or friction material wear
.
✔ Measure clutch plate thickness with a
caliper
and compare with factory specs.
✔ Replace
any worn or burned clutch discs
.
B. Gear and Bearing Inspection
✔ Check gear teeth for
pitting, cracking, or misalignment
.
✔ Spin bearings by hand and listen for
grinding or rough movement
.
✔ Use a
micrometer to check bearing tolerance levels
.
C. Seal and Gasket Inspection
✔ Inspect
shaft seals for cracks or leaks
.
✔ Replace
worn gaskets to prevent future leaks
.
Performing a detailed component inspection prevents the reassembly of damaged or worn-out parts .
5. Replacing or Refurbishing Clutch Plates, Bearings, and Seals
Once worn or damaged components are identified, they must be replaced or refurbished to restore transmission performance.
A. Replacing Clutch Plates
✔ Install
new clutch plates
in the correct sequence.
✔ Ensure
proper spacing and alignment
.
✔ Apply a
thin coat of transmission fluid
to prevent dry engagement.
B. Installing New Bearings
✔ Use a
hydraulic press to install bearings
without damaging races.
✔ Ensure
bearings are fully seated and rotate smoothly
.
C. Replacing Shaft Seals and Gaskets
✔ Remove
old seals carefully
to avoid scratching housing surfaces.
✔ Apply
sealant or lubrication
before installing new seals.
✔ Ensure gaskets are
properly seated to prevent future leaks
.
Replacing critical wear components extends the service life of the transmission.
6. Cleaning and Reassembly Best Practices
Before reassembling the Twin Disc MG5075A transmission , all components must be thoroughly cleaned to remove contaminants.
A. Cleaning Procedures
✔ Use
solvent and compressed air
to clean gears and housings.
✔ Ensure all
lubrication channels are clear
of debris.
✔ Wipe down surfaces with
lint-free cloths
to prevent contamination.
B. Proper Reassembly Steps
✔ Follow the
reverse order of disassembly
, ensuring
proper alignment
.
✔ Apply
fresh transmission fluid
to all moving components.
✔ Torque all bolts
to factory specifications
using a calibrated torque wrench.
C. Final Testing and Quality Checks
✔ Rotate the transmission manually to check for
smooth operation
.
✔ Perform a
bench test with hydraulic fluid
before reinstalling.
✔ Check for
leaks and proper engagement before full operation
.
A clean and properly assembled transmission ensures long-lasting performance and reliability .
Conclusion
The disassembly, inspection, repair, and reassembly of the Twin Disc MG5075A transmission require precision, proper tools, and a methodical approach .
Key Takeaways:
✔
Use the correct tools and set up a clean workspace
before disassembly.
✔
Drain fluids and remove external components
carefully.
✔
Inspect internal components for wear
and replace damaged parts.
✔
Ensure all surfaces are clean and lubricated
before reassembly.
✔
Perform final tests to verify smooth operation
.
By following these procedures, marine operators and technicians can ensure the Twin Disc MG5075A transmission remains reliable and efficient for years to come.
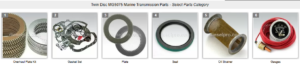
Plate Kit For Twin Disc MG5075A Marine Transmission
Gasket Kits For Twin Disc MG5075A Marine
Transmission
Videos About Twin Disc Transmissions
6 Reasons Your Twin Disc Transmission Has Low Oil Pressure
7 Reasons Your Twin Disc Transmission Is Overheating
3 Reasons Your Clutch Plates in Your Twin Disc Transmission Are Making Excessive Noise
Bull Gear On A Twin Disc Transmission
Rebuilt Twin Disc Transmissions
